Got a broken car door handle? Are you ready to tackle the repair? Well, you’ve come to the right place! Figuring out how to remove a door handle from your four-wheeler is easier than it may initially seem. With just a few simple tools and some know-how, your car will soon look as good as new. So, let’s take a walk through all the steps needed to successfully remove any type of door handle from your trusty ride.
Keeping the Vehicle in Good Condition Should Be On Top of Every Owner’s List
No matter what kind of four-wheeler you’re driving, whether it’s a brand-new car with a high price tag, a more affordable used vehicle, or even one with a salvage title, keeping each component in good condition and functioning properly is of utmost importance. Keeping the door handles in check is just one piece of this puzzle.
There Are Numerous Reasons Why Someone Might Need to Go Through This Task
One of the most common reasons is that the handle may have become damaged or broken, making it difficult to enter or get out of your four-wheeler. Another reason could be that the handles need to be replaced due to wear and tear or simply for aesthetic reasons to keep your car looking fresh and stylish while cruising down the famous routes in the US.
Additionally, you might need to access and repair components, such as the locking mechanism or the window regulator. In that case, you need to know how to remove the door panel as well. Whatever the reason, the process is fairly straightforward and simple, requiring only a few basic tools and a bit of patience.
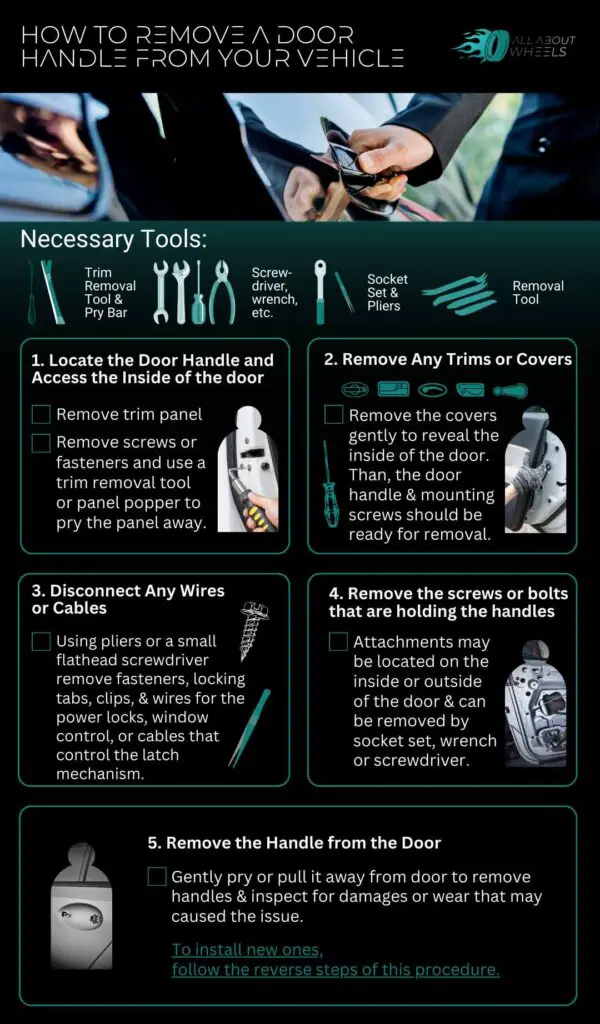
Gather Tools Needed to Remove a Door Handle From a Car
When it comes to car maintenance and repairs, having the right equipment is crucial. Modern vehicles have many specialized parts and components, and each requires specific tools for repair or replacement. Depending on the specific make and model of your four-wheeler, here’s what you might need for this particular task:
| Tool | Description | Approximate Price |
| Socket Set | A set of various-sized sockets for loosening and tightening bolts and nuts | $20-$100+ |
| Screwdrivers | Tools for removing screws and fasteners | $5-$20+ |
| Trim Removal Tool or Panel Popper | A tool designed for safely removing interior trim pieces or panels | $5-$20+ |
| Pliers | Needle-nose pliers for reaching tight spaces, slip-joint pliers for gripping | $5-$20+ |
| Removal Tool | A specialized tool designed for removing specific types of door handles | $10-$30+ |
| Pry Bar | A tool for prying or lifting parts | $5-$20+ |
It’s Important to Invest in High-Quality Tools
It’s worth noting that the prices listed above may vary depending on the brand, quality, and location of purchase. That’s why it’s always a good idea to compare prices and read reviews before purchasing tools to ensure that they are the right fit for the task.
As you can see above, these basic tools are pretty affordable. Moreover, they’ll come in handy for other maintenance jobs you might have to do in the future, like replacing the brake pads or installing LED lights. For example, high-quality socket sets such as the 145-piece Amazon Basics Mechanics Socket Set are a pretty good investment, as you can do much more with this set than simply changing a flat tire.

How to Remove a Door Handle – A Step-By-Step Guide
No matter if you’re trying to learn how to remove a front door handle or the ones in the back, the process is pretty much the same. However, the designs may vary depending on the make and model, so consider the owner’s manual your essential helping hand in this task.
Let’s go over the standard steps you need to follow in order to remove the handles on your car’s doors, and afterward, I’ll discuss some more specific techniques depending on their style:
Step 1: Locate the Door Handle and Access the Inside of the Door
First things first, you should locate the handle you wish to remove and access the inside of the door. The location may vary depending on the make and model of the vehicle. Still, it’s typically on the outside and connected to a metal rod or cable that controls the latch mechanism.
The interior trim panel will need to be removed to access the inside of the door. This may involve removing screws or fasteners, as well as using a trim removal tool or panel popper to safely pry the panel away from the door. It’s crucial to take care when removing the trim panel to avoid damaging any electric connections or other components.
Step 2: Remove Any Trim or Covers
Once the trim panel is removed, the inside of the door should be visible, along with the handle mechanism. The next step is to remove any trim or covers that may be covering the handle or its mounting screws. This may involve removing a rubber or plastic cover or other trim pieces that are attached to the whole assembly.
These covers may be held in place by screws or fasteners or may simply snap on or off. Either way, it’s essential to be gentle when removing the covers in order to avoid any damage to them or other components. Once that’s done, the door handle, as well as its mounting screws, should be visible and ready for removal.
Step 3: Disconnect Any Wires or Cables
Before you go ahead and remove the handles, it’s important to disconnect any wires or cables that may be attached to them. This includes wires for the power locks, window control, or cables that control the latch mechanism.
For electrical connections, a small flathead screwdriver may be used to release any locking tabs or clips. At the same time, the fasteners holding cables in place can be removed with pliers or a screwdriver. Of course, be very careful while disconnecting these components, as the last thing you want to do is damage them and cause further issues.
Step 4: Remove the Screws or Bolts Holding the Handle in Place
After you’ve taken care of the wires, the next step is to loosen the screws or bolts that are holding the handles in place. These attachments may be located on the inside or outside of the door, depending on the make and model of your vehicle.
Depending on the type and size of these screws or bolts, they may be accessed using a socket set, wrenches, or screwdrivers. Just make sure to keep track of everything you’ve removed, as it’ll be of great help once it’s time to reassemble the whole thing.
Step 5: Remove the Handle From the Door
Once all screws or bolts have been removed, the part should be easily detached from the panel. This may involve gently prying or pulling it away from the door while being careful not to damage any other components or wiring. If it’s still attached, double-check to ensure that all screws or bolts have been removed before applying any additional force.
Once the handles are completely detached, they can be inspected for any damage or wear that may have caused them to malfunction. If they need to be replaced, new ones can be installed just as easily by using the reverse steps of this procedure.
Additional Tips for Removing a Door Handle From a Car
Any DIY project comes with a fair amount of tips and tricks that can ensure a safe and successful process. When it comes to this particular task, here are a few additional tips to keep in mind:
- It can be helpful to take photos or make notes of the location and orientation of any screws or bolts that you’ve removed, as it can help you once it’s time for reinstallation,
- It may be necessary to use lubricant or penetrating oil to loosen any stubborn screws or bolts,
- If any wiring or cable is damaged during the process, it should be replaced or repaired before reassembly.
Take Necessary Precautions
When working on any maintenance or repair tasks, it’s crucial to take necessary precautions in order to make sure everything goes over safely and without any unnecessary damage. This includes disconnecting the car battery to avoid electrical shock, wearing eye protection to prevent injury from debris, and using proper lifting techniques when removing heavy components.
Learn What Are Common Mistakes and Avoid Them
When it comes to this task, some common mistakes are using the wrong tools, overtightening screws or bolts, not following the correct sequence for reassembly, and not properly torquing critical fasteners.
To avoid these common mistakes, it’s crucial to research and plan the job ahead of time and follow all safety precautions. If in doubt, it’s always a good idea to consult a repair manual or seek the advice of a professional mechanic.

A Couple of Specific Methods
As mentioned before, the specific way you’ll handle this task depends on the make and model of your vehicle. That’s why I’ve compiled additional tips for a few specific scenarios:
How to Remove a Door Handle With No Screws
If there are no visible screws or bolts holding the handles in place, they might be secured using a clip-style fastener. In this case, it’s best to use a small flathead screwdriver or trim removal tool to gently pry the fastener away from the panel. Once it’s successfully detached, the handles can be gently pulled away.
How to Remove a Door Handle With Hidden Screws
If your vehicle has hidden screws, they might be located underneath a trim piece or cover that needs to be removed to access them, and that should be done with a trim removal tool or a flathead screwdriver. Once the screws are exposed, they can be removed in the usual way by using a socket set or screwdriver.
How to Remove a Kwikset Door Handle
To detach Kwikset handles, the first thing you should do is find the set screw, a small screw located on the underside of the handle or collar that attaches it to the door. Once you’ve located this component, use an appropriate-sized Allen wrench to pry it away, and the handles should be able to be removed from the panel with ease.
Change the Door Handle Without a Trip to the Mechanic and Save Up
Maintaining and repairing your four-wheeler by yourself can be a rewarding and cost-effective way to keep it running smoothly and extend its lifespan. With the right tools and a bit of skill, the job will surely be done properly and safely. After you’re finished, all that’s left to do is enjoy the ride!


