Everyone loves the feeling of hitting the open road every once in a while. But have you ever noticed an unpleasant musty smell coming from your car’s cabin while driving? If so, it might be time to learn how to replace the cabin air filter! Not only can this make for more pleasant journeys, but it can also have several positive impacts on both your health and the overall performance of your vehicle. Let’s check how to do it.
To replace the cabin air filter in your car, locate the filter housing under the dashboard on the passenger side. Remove the old component by unclipping the housing and pulling it out, then insert the new one by following the arrows indicating its direction. Reattach the housing and make sure it is secure.
What Are Cabin Air Filters?
Many years ago, vehicles didn’t have all the advanced components like nowadays. For example, did you know that most popular import cars in the US have cabin air filters installed? In fact, more than 90% of four-wheelers all over the world have air filters. These are installed in the heating, ventilation, and air conditioning (HVAC) system of a car’s cabin.
They are designed to filtrate out dust, dirt, pollen, and other pollutants that can enter the car through the HVAC system, providing clean air for the occupants to breathe while driving. These filters are typically made of pleated paper or other materials and need to be replaced periodically to maintain their effectiveness in keeping the cabin air clean.
Why Do You Need to Learn How to Replace a Cabin Air Filter?
There are several reasons why you should be able to do this process by yourself. First and foremost, dirty or clogged filters can compromise the air quality in the cabin, which can be harmful to your health, especially if you suffer from allergies or respiratory issues.
It can also reduce the efficiency of your car’s HVAC system, resulting in decreased airflow and potentially higher fuel consumption. Knowing how to replace this car part is a simple and inexpensive way to ensure your vehicle’s air quality is clean and healthy and that its HVAC system is working properly. If anything, it doesn’t have to be another car expense.

What Should You Get Before Getting Started?
Although you’ll be cutting down some car expenses, you’ll need to have all the necessary gear for this DIY project. Maybe you already have some at home, but here’s a table of things you may need when replacing these components:
| Item | Price |
| Replacement part | From $10 to $70 |
| LOCCEF Gloves | $20.90 |
| MR.SIGA towels | $14.99 |
| Screwdriver and pliers set | $21.99 |
| K&N cleaning solution | $21.99 |
How Often to Replace a Cabin Air Filter in a Car?
The frequency with which you need to change this vehicle part can vary depending on factors such as driving conditions and manufacturer recommendations. However, as a general rule of thumb, it is recommended to replace it every 12,000 to 15,000 miles or once a year, whichever comes first.
Right after this, you may wonder how much money to replace the cabin air filter is needed. When doing it yourself, prices can range from $10 to $40. If you frequently drive in dusty or polluted environments or notice reduced airflow from your car’s HVAC system, then it may be necessary to replace it more frequently.
Try consulting your car’s owner’s manual or look up the manufacturer’s recommendations for specific guidance on when to do this. After all, if you follow all drivers’ responsibilities, you’ll just prolong the life of your four-wheeler.

Step 1: Locate the Cabin Air Filter
Locating this component in your four-wheeler is the first step in replacing it. The location can vary depending on the make and model of your car, but it is typically located in the HVAC system under the dashboard on the passenger side of the vehicle. In some cases, the filter may be easily accessible from under the hood or behind the glove compartment, while in other cases, it may require removing a cover or panel to access it. Here are some common locations:
Under the Dashboard
Many cars have these filters located under the dashboard on the passenger side. It can be accessed by opening the glove compartment and removing any stops or screws that hold the compartment in place. It is usually located behind a cover or panel that can be removed by unclipping or unscrewing it.
Behind the Glove Compartment
Some vehicles have them located behind the glove compartment. To access them, you may need to remove the glove compartment by releasing any retaining clips or screws that hold them in place. Check also for housing that can be opened or removed to access the filters.
Under the Hood
Some four-wheelers have these components located under the hood, near the windshield wipers or firewall. They can be accessed by lifting the hood and locating the housing that holds the filter.
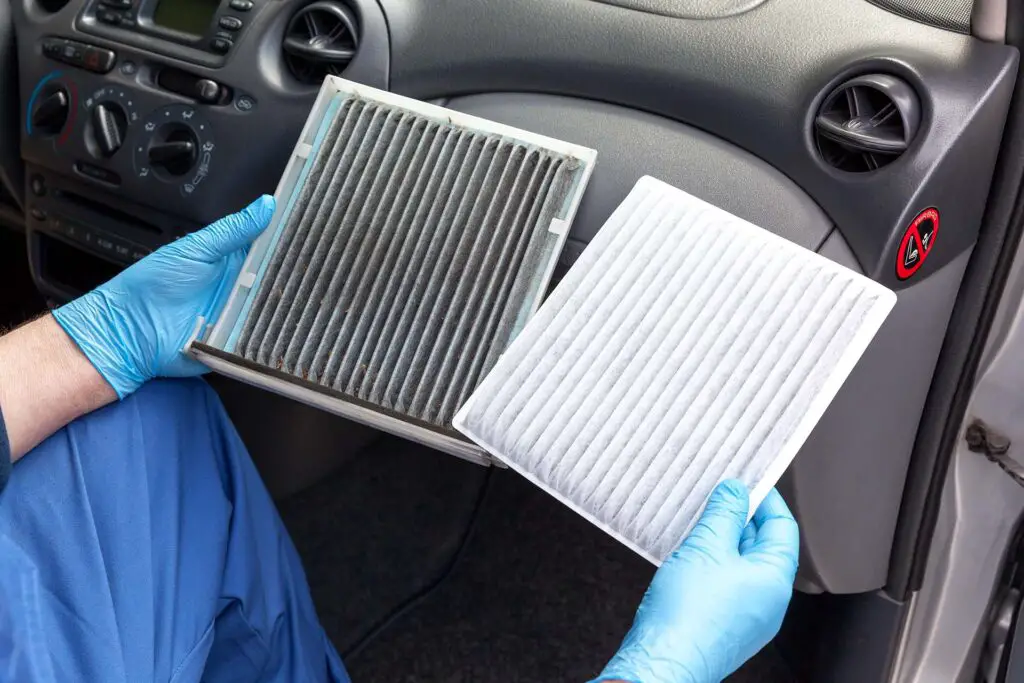
Step 2: Remove the Old Cabin Air Filter
The next step is to remove the old element. Once you have located the housing, open it up and carefully remove the old filter. Depending on the type of housing, filters may be held in place with clips, screws, or a latch.
How to Remove the Old Cabin Air Filter Safely?
Doing any kind of DIY project with your four-wheeler, there’s one rule that goes first – keep yourself safe. Even if removing an old component may seem like a breeze, think twice and follow the instructions to do this step safely. Here’s what you should do:
- Turn off the HVAC system – Before you start removing the component, turn off the HVAC system to prevent debris from being blown into the cabin.
- Locate the housing – The filter housing is usually located under the dashboard on the passenger side of the vehicle. Refer to your car’s owner’s manual for the exact location.
- Open the housing – Depending on the type of housing, some filters may be held in place with clips, screws, or a latch. Carefully open the housing without damaging any components or the housing itself.
- Remove the old part – Gently detach the old part from its housing and carefully pull it out. If the part is dirty or covered by debris, be careful not to release any of it into the cabin air system.
- Inspect the old filter – Check the old part for any signs of damage or wear, such as discoloration or excessive debris accumulation. If it’s damaged, replace it immediately.
- Dispose of the old element – Place the old part in a plastic bag and dispose of it properly according to your local regulations.
Tips for Handling a Dirty Cabin Air Filter
Handling a dirty component can be tricky because it may contain contaminants that can be harmful to your health. Here are some tips to help you handle a dirty cabin air filter safely:
- Wear gloves – When handling dirty filters, wear gloves to prevent exposure to contaminants that may be on the component.
- Avoid shaking it – Shaking filters can release contaminants into the air, which can be harmful to your health. Instead, carefully remove them from their housing and place them directly into a plastic bag.
- Dispose of it properly – Seal the plastic bag containing the dirty part and dispose of it according to your local regulations. Some filters may need to be disposed of as hazardous waste.
- Clean the filter housing – After removing the part, use a damp cloth to clean the housing to remove any remaining debris or contaminants.
- Wash your hands – After handling dirty filters, wash your hands thoroughly with soap and water to prevent the spread of contaminants.
With all these tips, you can handle these components safely and avoid exposure to harmful contaminants. Remember to always put your and others’ safety first, no matter what kind of project you’re doing.
Step 3: Clean the Air Filter Housing
It’s important to ensure the housing is completely ready for a new part you’re planning to install. That way, the new filter will work effectively and provide clean air to the cabin. After all, don’t expect that only the filter gets dirty over time.
Dirt and debris can accumulate in the filter housing, which can hinder airflow and reduce the efficiency of the HVAC system. Cleaning the housing will help remove any contaminants and ensure proper airflow.
How to Clean the Air Filter Housing Effectively?
To clean the air housing effectively, first, remove any loose debris or dust using a soft cloth or a vacuum cleaner. Then, use a damp cloth or a mild cleaning solution to wipe down the interior of the housing, being careful not to damage any components or the housing itself.
Make sure to remove any dirt or debris that may have accumulated in hard-to-reach areas, such as corners or crevices. Allow the housing to dry completely before installing the part. Cleaning the housing thoroughly will help to ensure proper airflow and improve the efficiency of the HVAC system, which will, in turn, provide cleaner and healthier air to the vehicle’s cabin.
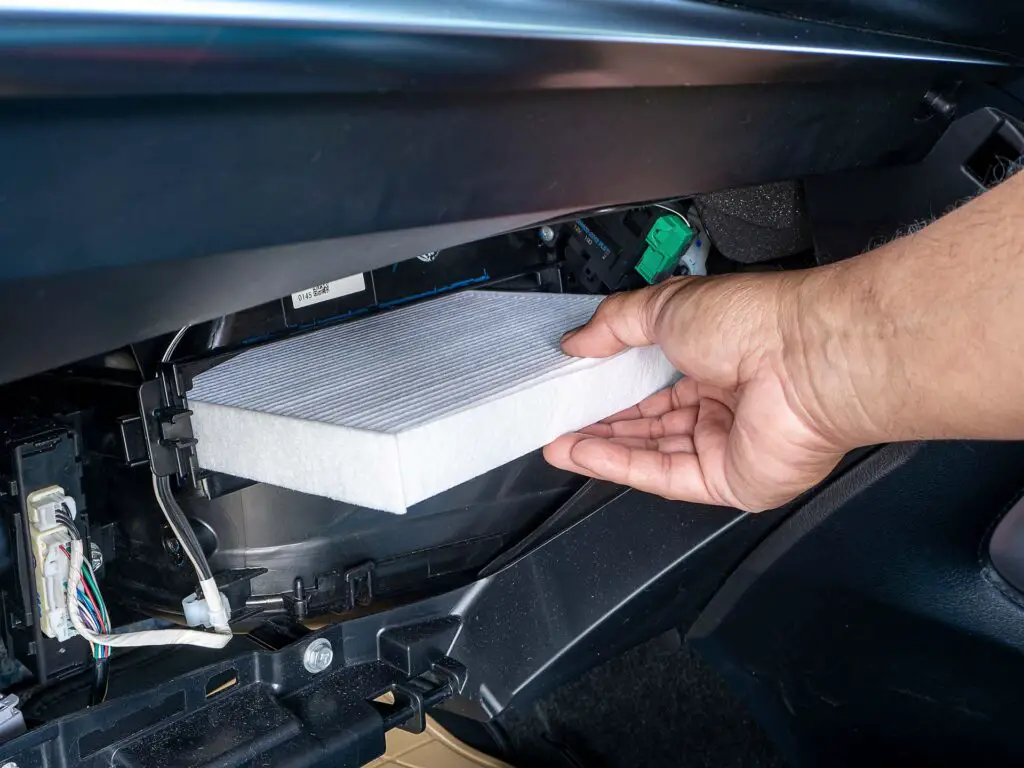
Step 4: Install the New Cabin Air Filter
Before you begin, it’s important to select the right replacement cabin air filter for your vehicle. These filters come in various sizes and shapes, so it’s important to choose one that matches your car’s make and model. To select the right replacement, refer to your car’s owner’s manual or consult with a parts specialist at an auto parts store. They can help you find the right fit for your car.
How to Install the New Cabin Air Filter Correctly?
Once you have the right replacement part, follow these steps to install it:
- Insert the new component – Carefully insert the new filter into the housing, following the arrows indicating the direction of airflow.
- Secure the part – Make sure that it is properly secured in the housing and that it is not loose or off-center.
- Close the housing – Carefully close the housing, ensuring that any clips or latches are securely fastened.
Step 5: Test the New Cabin Air Filter
To test the new part you just installed, turn on the heating, ventilation, and air conditioning (HVAC) system and set it to the highest fan speed. Take note of the airflow from the vents and any unusual smells or sounds.
If you notice any issues, such as reduced airflow or strange smells, double-check the installation to ensure it is properly secured and inserted in the right direction. If the issue persists, it may indicate a problem with the HVAC system, and it may be necessary to seek the assistance of a professional mechanic.
If everything seems to be working correctly, take note of the improved air quality in the car’s cabin. The air should smell cleaner and fresher, and any dust or debris that was previously present should be gone.

Learn How to Replace the Cabin Air Filter, and Your Ride Will Be More Enjoyable
All in all, no auto job is too daunting to tackle, and the same goes for learning how to deal with replacing this kind of component in your four-wheeler. Start with buying the right part for your desired vehicle and make sure it’s fitted properly to get the best performance out of your ride. With this knowledge, you can take pride in being able to upgrade your own car yourself rather than relying on an outside service.


