A safe ride depends on many things, and full-functioning wheels are of the essence. But flats can be easily prevented by learning how to replace a valve stem. Although they are not the sole cause of air leakage, if your tire is deflating and you can not see the cause, a faulty valve stem is the probable culprit.
A valve stem is an important part of a car’s tire and wheel assembly. If it becomes damaged, it can cause a loss of air pressure in the tire, which can lead to a flat, and if you don’t know how to change a flat tire, you’ll end up stuck by the road. Replacing a valve stem is a relatively simple process, but it’s important to know how to do it properly in order to avoid damaging the tire or wheel. Or to avoid unnecessary driving stress altogether.
Valve Stems Are an Essential Component of Wheels
Every car in the world, from the most expensive pieces to the family models, relies on a full-functioning set of wheels. The wheel is one of the most important discoveries in the history of mankind, and it has made cars as we know them today possible. Although they may vary in size, design, and structure, their function is the same, as well as their components.
The wheel assembly has several vital components responsible for a functioning wheel. It includes the hub, rim, tire, and spokes. Wheels are also the region where the lateral surface of the rotor, the lug bolts, and the axle seat all come into touch. The valve system serves the purpose of inflating and deflating the tires. If the mechanism fails, your tires may lose pressure and deflate gradually as you drive.
More About the Valve System in the Tires
The valve system on car tires is a critical component that helps to regulate the air pressure within the tires. Without this system, the tires would be subject to potentially damaging levels of pressure that could cause them to burst. It consists of a series of valves mounted on the tire’s rim. Each valve is connected to a tube that leads to the air chamber within the tire.
When the tire is inflated, the air pressure within the chamber forces the valves open so that air can flow into the tire. As the tire deflates, the valves close to prevent further loss of air. The valve system is typically made from brass or other durable materials to withstand the high pressures that are present within the tires.

Why It’s Important to Know How to Replace a Valve Stem
As a car owner, there are a few things you should learn to handle by yourself if the need arises and also to cut down on car expenses. No matter how much attention you pay to your vehicle, there is a high level of probability that something unexpected will occur. And most likely, while you’re driving somewhere, not even remotely near a mechanic.
In truth, learning how to replace U-joints or even how to disconnect car alarms may be a bit tougher and more complex. But handling things such as adding brake fluid and figuring out whether the spark plug is bad is pretty straightforward. Replacing a valve stem is perhaps something you can leave to your mechanic, but it’s manageable at home, too. So, let’s explore the process.
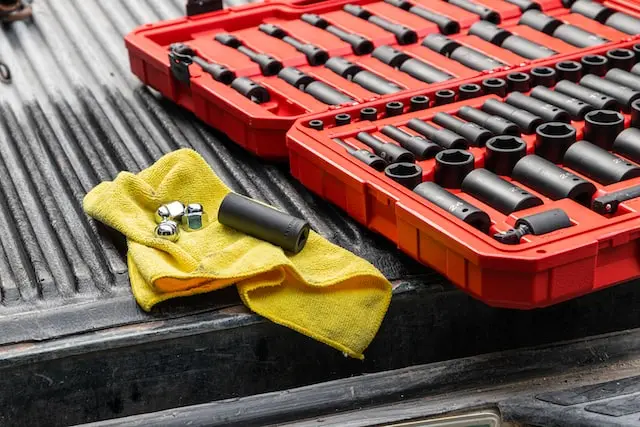
The Required Tools and Materials
Since most of us have been used to not living without a car, purchasing a set of tools should be one of our priorities. As for your tires, you may need a tire repair kit that’s not in a standard set of tools, but you can find it at your local spare parts store.
Assuming you have a standard tire valve stem, you will need the following tools and materials:
- A tire valve stem tool (this is a small, inexpensive tool that can be purchased at most auto parts stores),
- A new tire valve stem (again, this can be purchased at most auto parts stores),
- A Phillips head screwdriver,
- A flathead screwdriver,
- An air compressor with a hose,
- A jack and jack stands,
- Needle nose pliers,
- Lug nut wrench,
- Tire iron.
All these tools will be useful in the process. However, keep in mind that there are three ways you can go about this.
Install the Stem on a Tireless Rim
Your tires may lose air due to a damaged valve stem, leaving you with an issue. Professional repairs can cost more than $30, but in some cases, you might be able to swap out a bad stem on your own. But, let’s start with perhaps the simplest approach – changing a valve stem on a rim without the tire mounted on it.
How to Replace It With the Tire Still Mounted
If your tire isn’t removed from the rim, you can still replace the necessary part. The difference is in the approach and in the tools you will require. Follow these steps:
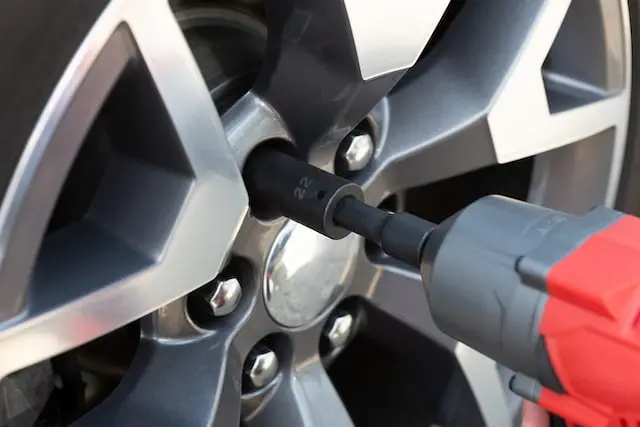
- If it isn’t already, you must take the wheel off the car it is mounted on. Lifting the wheel off the ground requires sliding a jack underneath the appropriate point that is closest to the wheel in question and raising and lowering or rotating the handle. Before raising up the car from the ground, loosen the lug nuts on the wheel using a socket wrench or tire iron. In order to support the vehicle while you operate on the wheel, position a jack stand below it.
- Take the wrench, and use it to loosen and remove the lug nuts by unscrewing them counterclockwise. Once they are removed, keep them somewhere safe so you don’t displace them. However, you can buy new ones at the closest store that sells car parts.
- You should now pull the wheel off and lay it on the ground, face down. A rubber mallet may come in handy if you can’t remove the wheel with ease due to rust. Hit on the sidewall of the rubber part.
- Use the valve-changing tool to release the air from the tire. Once you apply pressure, the air will start to leak out. Also, a screwdriver or a similar tool can do the job, too.
- Use your finger to compress the valve towards the side, so it is level against the wheel after the tire has completely lost all of its air. Press the hook of the valve changing tool into the valve stem’s base so that it enters the wheel.
- Pull the valve changing tool straight up out of the wheel after rotating it a quarter turn in either direction. The tool’s hook will grab the valve stem’s base and draw it out using the tool.
Install a Brand New Valve Stem
There is an inserting tube included in the valve stem changing tool packages that should be fitted over the hole with the bigger opening pointing up. Once you align the tube with the hole, it will guide the new part directly toward the place it needs to be. The only thing you have to make sure of is that it’s not misaligned and that you press it into place.
The new part should be well lubricated with an automotive lubricant before the installation, so it can seal the valve stem once it’s positioned into place. Once lubricated, it will also be a lot easier to insert it through the hole. Next, the top of the stem should be placed into the insertion tool. You should use one quick motion to press the part into the tire, and with a good deal of pressure, too.
Pulling backward on the handle will bring the majority of the part through the hole. The bottom ring will serve to prevent the valve stem from going through all the way. In the end, remove the insertion tool with one strong motion, and refill the tire with air. You can now place the tire back on the car.

The Best Reviewed Valve Stems on the Market
If you don’t want to shop around for the parts you’re not sure of, our table lists the best valve stem kits on the market currently and their prices.
| Brand | Specifications | Price |
| Gorilla Automotive Flush Mount Smooth Cap Valve Stems – VS407C | Universally fitting, has knurled edges for easy on-and-off access. Comes in a set of 4 and has a smooth cap. Fits most aftermarket rims. | $21.26 |
| Gorilla Automotive Valve Stem Filler Tube – FT-1 | Universally fitting, but it should be used with Gorilla Flush Mount Valve Stems. | $7.99 |
| CKAuto TR415 Tubeless Rubber Snap-in Tire Valve Stem | Universally fitting for high-pressure tires. Snap-in technology, but for TPMS Valve Only. They are sold individually. | $19.99 |
| Colby Valve Permanent Valve Stem Replacement | It installs from outside of the wheel. | $28 |
| Frienda 100 Pieces Tire Valve Stems | These snap-in valve stems for tires, made from high-quality brass and ozone-resistant rubber, have undergone rigorous testing for EPDM, ozone resistance, and leakage. They come equipped with high-temperature brass valve cores, which ensure superior performance and long-lasting service. This valve stems are both cost-effective and practical, making them an excellent choice for your tire needs. | $22.99 |
| Riseuvo Valve Stem Puller Installer Tool | It is a specialized tool designed for removing and installing valve stems on tires. | |
| Tallew Double Seal Valve Stem Cap | These valve stem caps are designed for truck tires and are primarily composed of premium copper, which ensures their durability and solidity. These caps are resistant to breakage and deformation, and their metallic luster persists even after prolonged use. They do not easily fade or corrode, making them a dependable and long-lasting solution for your needs. | $12.99 |
With These Useful Tips, Your Tire Will Be as Good as New
While your tires should be replaced occasionally, replacing a valve stem on your car tire is an easy process that can be completed in a few minutes with the right tools and instructions, and can prevent flats. By following our simple tips, you can have the job done quickly and efficiently and be back on the road in no time.
We’ve outlined everything you need to know so that you can successfully replace your valve stem without any trouble. By following one of the three methods, you can avoid common mistakes, complete the job with minimum effort and avoid driving anxiety.


