Cars are made up of numerous parts that must function well together. If one thing starts to fail, others may come along with it, making the vehicle deteriorate faster than normal. Car door seals are among those parts; learning how to fix a leaking car door seal isn’t complicated, but it is crucial for the car’s functioning.
What Is a Car Door Seal?
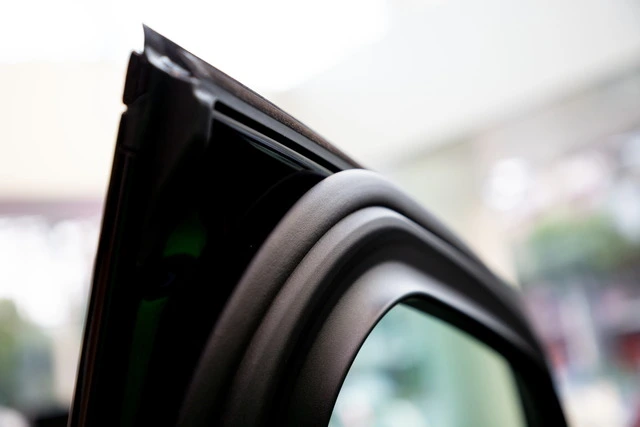
Car door seals are the rubber parts on car doors that prevent the vehicle from getting flooded and the passengers from getting cold and eliminate any external noises. They’re essentially the insulation material on the car. You’ll often hear or see them being called “weather stripping.”
Insulation materials are important because they protect the internal environment. Cars are no exception and may be even more important since driving means being on the go regardless of the weather.
Off-road vehicles need excellent insulation, as drivers must be safe in any environment. The elements can be tricky, so besides paying attention to your winter and summer tires, keeping your car door seals in place is also crucial.
Where Is It Located?
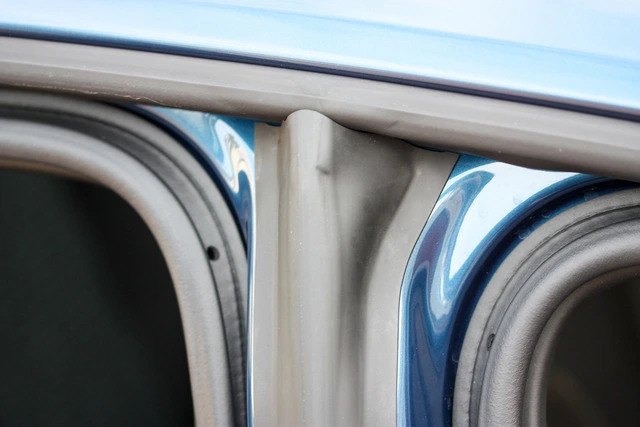
Car door seals are attached to the edges of the car door, hence the name. These seals are made of soft rubber and are glued to the sides of the door and the edges of the car’s entrance points.
Pay attention the next time you get into your car – you’ll see an insulation rubber all along the edges of the area where you enter the vehicle. This rubber is typically a bit wider and thicker than the one on the car door itself, although this depends on the manufacturer. Most, if not all cars have these seals.
Is It an Irreplaceable Part?
These rubber insulation parts around the edges of your car doors and doorways aren’t irreplaceable, although they can be tough to glue back on. Super glue should do the trick on any type of material, but rubber and metal don’t always glue together as easily as expected.
What Causes Rubber Seals on Car Doors to Start Leaking?
There can be multiple reasons for car door seals leaking. They include:
- Wear and tear,
- Degraded glue quality,
- The seals are clogged with dirt, rain, and snow.
The most common cause of weather stripping getting loose and falling off is wear and tear. Over time, cars and their inner and outer parts degrade, which is normal. Aesthetic parts aren’t always urgent to replace, but car door seals count toward function and beauty almost equally.
The glue used to seal the rubber can also degrade over time, which you can’t prevent. If it does happen, repairs are in order. Sometimes, they can also get clogged with dirt or water and don’t work well or fall off. Cleaning your car after heavy weather is recommended.
If you didn’t deem it necessary to wash your car after rain or snowfall, you’ll be surprised to hear that cleaning your seat belts is also a thing, as well as polishing the steering wheel on occasion. I use a Chemical Guy cleaning kit.
Can It Be Fixed?
In short, yes, leaking car door seals can be fixed. The question is – how easy is it to repair? If the damage is minimal (in just one small area), some glue can solve that problem easily. However, bigger damage will warrant the extra effort and, potentially, professional assistance and repair.
The Signs of a Bad or Degrading Car Door Seal
Just as there are causes for weather stripping degradation, there are also some telltale signs of it. You likely don’t stare at the rubber seals every time you’re nearby, and even if you did – you might not be able to tell if something’s wrong.
Here’s how to tell if your car door seals are damaged:
- The doors are leaking – the most obvious and common sign of bad weather stripping are leaks. If you’re cruising around while it rains and you get wet – that’s not normal; it’s a sign to check your car door seals,
- A lot of noise comes in from the outside – a little noise and sounds from the outside world are normal; however, if you’re able to hear absolutely everything that goes on out there, that means your insulation seals aren’t doing their work,
- The car doesn’t retain heat – blasting the A/C to warm up your vehicle may end up being pointless in case of bad weather stripping. This will only spend your battery further and cause other problems. When the vehicle stops retaining heat, it’s time to check the seals on the doors,
- A lack of bounce and softness in the rubber – if you’ve ever seen weathered car door seals, you know they look almost compressed and don’t have the rubbery bounce anymore. This means they’re outdated and likely will stop doing their job soon,
- The rubber seals are cracked – brittle and hardened rubber seals will also display some cracks and holes here and there. For anyone unsure how to spot hardened rubber seals, check for cracks – these two usually come hand in hand,
- The car is old, and the seals were never replaced – if your car is 20+ years old, replacing the weather stripping would be common sense at this point; as vehicles get older, the chances of degradation rise, too.
How to Fix a Leaking Car Door Seal – the Methods
Fixing car door seals at home is possible and easy. You can use the stuff you have at home to make repairs or head to the nearest hardware store and buy whatever’s necessary for that feat.
There are three main methods for resolving this issue, ranging from simple to complex. Your method of choice will depend on the severity of the problem or the seal damage.
#1 Use Weatherstrip Adhesive
You’ll need:
- Weatherstrip adhesive,
- Snap-clamp (optional).
The first method would be ideal – using weatherstrip adhesive to reattach the rubber to the metal door. If you have a nice snap clamp in your toolbox, use it to help the glue hold better.
Firstly, you should check the doors for areas where the rubber has come off. If there are multiple, be ready to fix them in one sitting; this is important, so take a day off for some designated repairs, add brake fluid – you can order Motul DOT 5.1 High Temp. Brake Fluid, and check the car thermostat.
Wherever you find a gap in the seal, add weatherstrip adhesive and press tightly for a firm hold. This adhesive looks similar to super glue – it’s sold and used in a tube. Weatherstrip adhesives aren’t vehicle specific, so it doesn’t matter which one you get.
When you apply the adhesive, ensure to press tightly, or if you have snap clamps, use them. These clamps will ideally apply enough pressure to reseal the rubber.
Weatherstrip is pretty affordable, so you won’t break the bank when making these repairs (which is good!) The table below shows the most popular adhesives for this purpose, their costs, and their benefits.
| Name | Amount | Price |
| Permatex 81158 | 3 ounces | $6 on Amazon |
| Loctite 908570 | 2.7 ounces | $6 on Amazon |
| J-B Weld 31319 | 3 ounces | $7 on Amazon |
| Permatex 82180 | 3 ounces | $6 on Amazon |
| 3M 08609 | 10.5 ounces | $28 on Amazon |
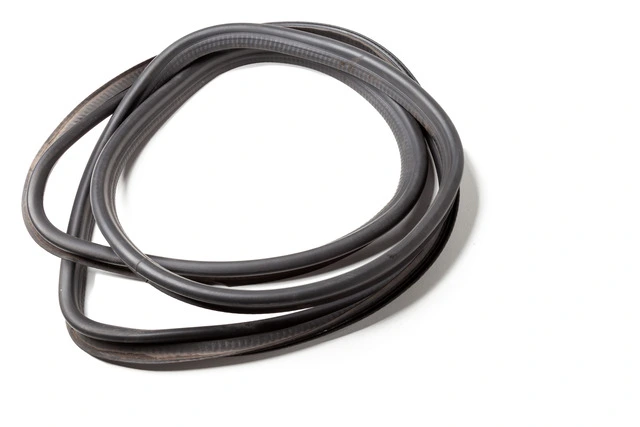
#2 Add Missing Rubber by Patching the Area
This requires:
- Universal weather seal,
- Scissors or another adequate cutting tool,
- Weatherstrip adhesive,
- Snap-clamps (optional)
In case you notice a torn area, you can always patch it together with additional weather seals. These can be purchased at any hardware store, by the roll.
Measure (approximately or accurately – up to you) the amount of rubber seal you’ll need for the patching and cut it with whatever you have. Later, use the same weatherstrip adhesive from before and patch up the area that’s missing rubber.
This will be more affordable and less complicated than replacing the entire car door seal, so if you notice a “bald” spot, add some more rubber to it, and it’ll be fixed before you can say “weather stripping.”
#3 Replace It Completely
For this, you will need:
- Universal weather seal,
- Screwdriver,
- Adhesive remover,
- Clean cloth,
- Cutting tool,
- Weatherstrip adhesive.
Don’t let me instill fear into your bones without a good reason for it. I know I said replacing the whole rubber seal is complex, but it’s not going to make you lose your mind. It’s not an IKEA nightstand.
Buy a universal weather seal by the roll, get some weatherstrip adhesive, and invest in an adhesive remover. Before planning how to attach a brand-new rubber seal to your car door, you have to remove the old one.
This is easy – just tug at the rubber and it’ll come off (especially if it’s old or torn). For places that seem stuck, try prying it off with a screwdriver, but be careful not to chip the paint. Some parts where the old rubber used to be will have some of the old adhesive left on them.
Use a cloth and a nice adhesive removal solution to rub the remaining glue off the door. When that’s done, measure how much weather seal you need, cut it if necessary, and add it to the car door with the rubber glue.
It’s not complicated, but you’ll have to pay attention to the location of the seal and how much you cut. If you get someone to help you, that would be perfect.
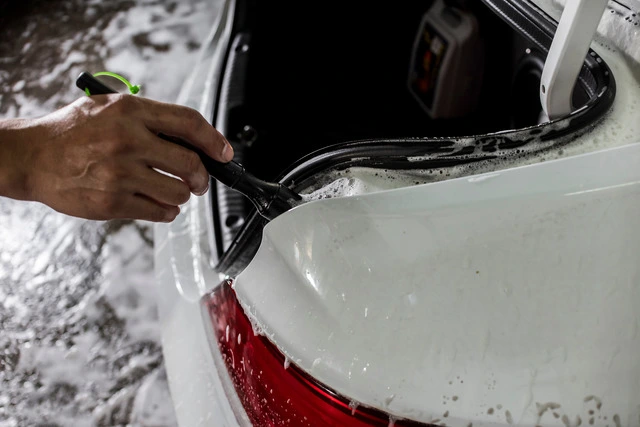
What to Do to Prevent Weather Stripping from Degrading
To prevent the weather stripping from ever degrading or falling apart, the secret is to clean it. When you decide to wash your car, take the time to do some inner cleaning as well.
For this, you only need a bucket of warm water, some detergent, and a cloth or a soft sponge. By dipping the cloth or sponge into the water and washing the seals, you’ll ensure they remain in good condition and that they’ll keep the car safe along the way.
A pro tip is to let the stripping air dry; that’s why, if you plan to clean your car interior, make sure to do it on a warm, rainfall-free day. Check the weather forecast before doing it, and take a day off when it’s sunny.
Another great tip is to invest in a spray that conditions the weather stripping; this can be purchased at any automotive or hardware store. Whatever you do, don’t spray the seal itself with this; instead, apply it to a cloth and wipe then.
What Happens if You Can’t Fix the Car Door Seal?
If your DIY weather stripping replacement goes (terribly) wrong, you can always start again. This isn’t some part of the car that will cost you hundreds of dollars and hours of your time. I mean, it might take a while, but not hours – that’s up to your skills and savvy.
If you’re nervous about doing the gluing alone, try it on a different surface first. Use some of the extra weather seals and adhesive, and practice. Although, keep in mind that gluing rubber to metal will be different from gluing it to another material.
Anytime You Need Efficient Fixing, Call a Mechanic
Finally, if push comes to shove, call a mechanic. Suffering in silence to become the master of DIY may not be in the stars for you that day. It can be pretty easy to mess up stuff on your car, which means fixing it won’t always end up the way you want it. Get professional help from a car expert and enjoy your warm, dry car again.


